Ubuntu、Debian之类的不同的发行版,其实就是不同的rootfs。Debian系的发行版有个工具叫debootstrap,可以从源那里下载最小的根文件系统。Arch相应的工具则是packstrap。
下完根文件系统之后chroot进去进行相应的配置,为了chroot到一个ARM的rootfs,我们需要用qemu-arm-static。进去之后apt-get你想要安装的东西。配完了之后烧进sd卡,通过内核参数root=xxxx告诉内核要挂载哪个rootfs,即可启动了。
要制作一个叉叉派的镜像都是这样的套路:bootstrap一个最小系统,安装内核模块,安装必要的应用程序,然后安装不同的桌面环境,最后打包。于是就制作出各种水果派的n多镜像,像Ubuntu core、Ubuntu mate、xubuntu、lubuntu、Debian,Arch等等,应有尽有。。
然而这些大型发行版的“最小系统”都相当的大,几百兆的样子,而我们的EBAZ4205只有128M的nand flash,所以只好从sd卡启动才能维持得了生活。
准备工作
我们先在一台Ubuntu主机上安装qemu-user-static、debootstrap,然后继续。后文一些命令如果没有安装,随时apt-get一下。
准备镜像文件
我们dd一个3.7G的空白镜像,这样可以烧录进一个标明4G的SD卡。姑且叫它ubuntu1804.img吧:
dd if=/dev/zero of=ubuntu1804.img bs=1M count=3500
然后我们将它挂载为loop设备:
sudo losetup -f --show ubuntu1804.img
如果你之前没有挂过别的回环设备的话,一般它会挂在/dev/loop0。
然后我们给它分区。可以用图形界面的工具如gparted,也可以用命令行工具如parted、fdisk等。比方说我们用fdisk。
sudo fdisk /dev/loop0
用n来添加新分区。顺着它的指示走下去即可。
| 文件系统 | 大小 | |
|---|---|---|
| 启动分区 | vfat | 256MB就够了 |
| 文件系统 | ext4 | 3.2G |
同步这些分区。这样会在/dev/mapper/下面生成对应的节点:
sudo kpartx -av /dev/loop0
格式化它们:
sudo mkfs.vfat /dev/mapper/loop0p1
sudo mkfs.ext4 /dev/mapper/loop0p2
挂载它们:
mkdir boot rootfs
sudo mount /dev/mapper/loop0p1 boot
sudo mount /dev/mapper/loop0p2 rootfs
uboot和设备树改动
我们要修改uboot环境变量,让它从SD卡里面读取内核和设备树。不过zc702工程的默认启动设备就是sd卡,我们只需要留意sdboot这个环境变量以及各种地址就好了:
-    "kernel_load_address=0x2080000\0" \
+    "kernel_load_address=0x8000\0" \
...
-    "devicetree_image=devicetree.dtb\0"    \
-    "devicetree_load_address=0x2000000\0"    \
+    "devicetree_image=zynq-zc702.dtb\0"    \
+    "devicetree_load_address=0x0\0"    \
...
     "sdboot=if mmcinfo; then " \
-        "run uenvboot; " \
         "echo Copying Linux from SD to RAM... && " \
         "load mmc 0 ${kernel_load_address} ${kernel_image} && " \
         "load mmc 0 ${devicetree_load_address} ${devicetree_image} && " \
-        "load mmc 0 ${ramdisk_load_address} ${ramdisk_image} && " \
-        "bootm ${kernel_load_address} ${ramdisk_load_address} ${devicetree_load_address}; " \
+        "bootm ${kernel_load_address} - ${devicetree_load_address}; " \
     "fi\0" \
我们还要修改设备树,添加启动参数,让内核挂载Ubuntu文件系统。其中rootwait这个参数表示需要等待根文件系统的挂载,不然内核启动很快,一看还没有挂上文件系统就会kernel panic了:
     chosen {
-        bootargs = "";
+        bootargs = "root=/dev/mmcblk0p2 rw rootwait";
         stdout-path = "serial0:115200n8";
     };
将BOOT.bin、uImage、zynq-zc702.dtb放进启动分区。
安装最小系统
接着就可以愉快地debootstrap了。不过可惜的是,国内Ubuntu源都没有同步armhf的port,只有x86的,所以只能用官方源了。
sudo debootstrap --arch=armhf --foreign bionic ./rootfs
但是国内的Debian就同步了arm的分支,比方说清华源:
sudo debootstrap --arch=armhf --foreign stretch ./rootfs https://mirrors.tuna.tsinghua.edu.cn/debian/
等一段时间下完基本系统,然后拷贝qemu进去:
sudo cp -av /usr/bin/qemu-arm-static rootfs/usr/bin/
还需要拷贝resolv.conf,以便联网:
sudo cp /run/systemd/resolve/stub-resolv.conf rootfs/etc/resolv.conf
然后chroot进去:
sudo chroot ./rootfs
在里面进行second-stage:
# chroot环境下面:
export LANG=C
/debootstrap/debootstrap --second-stage
安装完成之后,补全/etc/apt/source.list:
deb http://ports.ubuntu.com/ubuntu-ports bionic main restricted universe multiverse
deb http://ports.ubuntu.com/ubuntu-ports bionic-security main restricted universe multiverse
deb http://ports.ubuntu.com/ubuntu-ports bionic-updates main restricted universe multiverse
deb http://ports.ubuntu.com/ubuntu-ports bionic-proposed main restricted universe multiverse
deb http://ports.ubuntu.com/ubuntu-ports bionic-backports main restricted universe multiverse
deb-src http://ports.ubuntu.com/ubuntu-ports bionic main restricted universe multiverse
deb-src http://ports.ubuntu.com/ubuntu-ports bionic-security main restricted universe multiverse
deb-src http://ports.ubuntu.com/ubuntu-ports bionic-updates main restricted universe multiverse
deb-src http://ports.ubuntu.com/ubuntu-ports bionic-proposed main restricted universe multiverse
deb-src http://ports.ubuntu.com/ubuntu-ports bionic-backports main restricted universe multiverse
然后装一些基本的软件:
apt-get update
apt-get install sudo ifupdown net-tools ethtool udev wireless-tools iputils-ping resolvconf wget apt-utils wpasupplicant vim git gcc build-essential openssh-server
新建用户,就叫它ubuntu吧,密码也是ubuntu:
useradd -G sudo -m -s /bin/bash ubuntu
echo ubuntu:ubuntu | chpasswd
更改root密码:
passwd root
设置主机名为armhf:
echo armhf > /etc/hostname
设置网络,改/etc/network/interfaces文件:
auto lo
iface lo inet loopback

allow-hotplug eth0
iface eth0 inet dhcp
终端配色:将/home/ubuntu/.bashrc里面的force_color_prompt=yes注释删掉即可。
设置默认挂载目录:改/etc/fstab,将启动分区挂载到/boot目录上:
/dev/mmcblk0p1 /boot vfat defaults 0 0
如果没什么别的想要配置的话,就可以exit退出了。
注意,因为Xilinx的内核配置默认将所有驱动都直接编译进内核,所以不需要将模块安装到文件系统中,就一个放在启动分区的内核就够了。
烧录SD卡
我们将镜像文件卸载:
sudo umount ./boot
sudo umount ./rootfs
sudo kpartx -d /dev/loop0
sudo losetup -d /dev/loop0
我们看到这个镜像文件有3.7G那么大,但是世界上它占用的磁盘空间没那么大,它是个sparse file,将它打包压缩之后就没看上去那么大了。可以用ls -s来看到它实际上多大:
$ ls -sh ubuntu1804.img
1.2G ubuntu1804.img
现在我们直接将这个文件dd到一张SD卡里面:
dd if=ubuntu1804.img of=/dev/sd某
如果你的SD卡不只有4G,那么可以通过像gparted、parted、fdisk等等的分区工具将第二个分区拉大,然后resize2fs重新设置分区大小。gparted一般会自动帮你resize2fs。
上机测试
可以从串口看到完整的启动过程:uboot、kernel、systemd,然后是login:
U-Boot 2018.01 (Apr 24 2019 - 00:24:09 +0800) Xilinx Zynq ZC702

Model: Zynq ZC702 Development Board
Board: Xilinx Zynq
Silicon: v3.1
I2C:   ready
DRAM:  ECC disabled 256 MiB
NAND:  128 MiB

...

## Booting kernel from Legacy Image at 00008000 ...
  Image Name:   Linux-4.19.0-xilinx
  Image Type:   ARM Linux Kernel Image (uncompressed)
  Data Size:    4322424 Bytes = 4.1 MiB
  Load Address: 00008000
  Entry Point:  00008000
  Verifying Checksum ... OK
## Flattened Device Tree blob at 00000000
  Booting using the fdt blob at 0x000000
  Loading Kernel Image ... OK
  Loading Device Tree to 0eafd000, end 0eb037a6 ... OK

Starting kernel ...

Booting Linux on physical CPU 0x0
Linux version 4.19.0-xilinx (hyq@ict) (gcc version 6.2.1 20161114 (Linaro GCC Snapshot 6.2-2016.11))
#19 SMP PREEMPT Wed Apr 24 21:55:25 CST 2019
CPU: ARMv7 Processor [413fc090] revision 0 (ARMv7), cr=18c5387d
CPU: PIPT / VIPT nonaliasing data cache, VIPT aliasing instruction cache
OF: fdt: Machine model: Xilinx ZC702 board

...

VFS: Mounted root (ext4 filesystem) on device 179:2.
devtmpfs: mounted
Freeing unused kernel memory: 1024K
Run /sbin/init as init process
random: fast init done
systemd[1]: System time before build time, advancing clock.
systemd[1]: Failed to insert module 'autofs4': No such file or directory
systemd[1]: systemd 237 running in system mode. (+PAM +AUDIT +SELINUX +IMA +APPARMOR +SMACK +SYSVINIT
+UTMP +LIBCRYPTSETUP +GCRYPT +GNUTLS +ACL +XZ +LZ4 +SECCOMP +BLKID +ELFUTILS +KMOD -IDN2 +IDN -PCRE2
default-hierarchy=hybrid)
systemd[1]: Detected architecture arm.

Welcome to Ubuntu 18.04 LTS!

systemd[1]: Set hostname to <armhf>.
systemd[1]: File /lib/systemd/system/systemd-journald.service:36 configures an IP firewall (IPAddress
Deny=any), but the local system does not support BPF/cgroup based firewalling.
systemd[1]: Proceeding WITHOUT firewalling in effect! (This warning is only shown for the first loade
d unit using IP firewalling.)
random: systemd: uninitialized urandom read (16 bytes read)
systemd[1]: Reached target Swap.
[  OK  ] Reached target Swap.

...

[  OK  ] Started resolvconf-pull-resolved.service.

Ubuntu 18.04 LTS armhf ttyPS0

armhf login: ubuntu
Password:
Last login: Fri Apr 26 17:35:14 UTC 2019 on ttyPS0
Welcome to Ubuntu 18.04 LTS (GNU/Linux 4.19.0-xilinx armv7l)

* Documentation:  https://help.ubuntu.com
* Management:     https://landscape.canonical.com
* Support:        https://ubuntu.com/advantage

ubuntu@armhf:~$
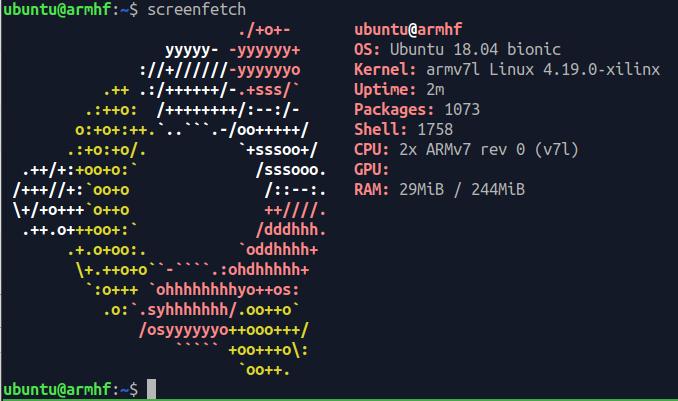
跑个screenfetch来看看:
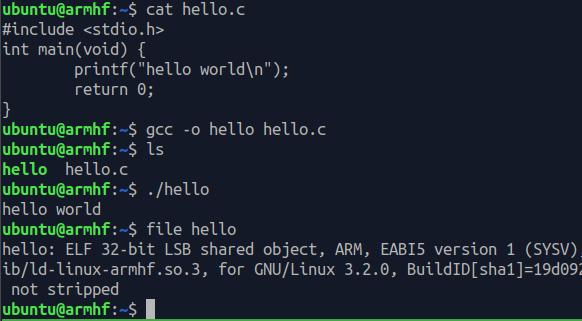
gcc真的能用。。但是真是慢。。